It’s that time of year again where your local girl scout will be knocking on your door pimping out cookies or their parents will be hawking boxes of goodness to their cube mates. Below you’ll find the ingredients plus a step by step photo tutorial on how to whip up a batch on heavenly balls of crack.
TOOLS AND INGREDIENTS:
- one box of Thin Mint Girl Scout Cookies, room temperature NOT frozen
- four ounces of cream cheese, softened
- two bags of Wilton vanilla flavored candy coating discs, in desired color
- one bag Wilton candy coating discs for your secondary color, if desired
- 1 container of Crisco
- a double boiler (or small sauce pan and a small to medium sized pyrex bowl
- two cookie sheet pans
- one box of parchment paper
- one wooden spoon
- one sandwich or quart sized ziplock baggie
- box of toothpicks
- 1/4 to 1/2 cup of water
Ingredient Note: Only purchase candy coating discs, never purchase coating sold in large bricks. The large bag of candy coating you’ll discover at many grocery stores doesn’t compare to Wilton’s quality when melted. It is available in various colors and flavors and can be purchased at Michael’s, Hobby Lobby or a baking supply shop in your local area.
THIN MINT COOKIE BALL RECIPE:
Place the entire box of Thin Mint Cookies, both sleeves, into a food processor. Pick back out two cookies… one to eat now and another to reserve for comparison purposes. Place the cookie reserved for later in a small ziplock bag and place in the freezer. Pulse the cookies until they resemble fine crumbs or dirt.
Dump cookie crumbs into medium sized mixing bowl, add the cream cheese in 1/8 sections with back of wooden spoon incorporate cream cheese until the cookie crumbles are coated, no evidence of cream cheese remains and the crumbs are now moist enough to roll into balls. You may NOT need the entire four ounces of cream cheese so be sure to incorporate in sections. Place the entire bowl in the refrigerator for five minutes to chill. While the cookie and cream cheese mixture is chilling locate a cookie sheet, gather the parchment paper and two cookie sheet pans. Line each pan with a single sheet of parchment paper ensuring the paper lies flat on the pan folding under if necessary.
Remove the bowl from the refrigerator and roll cookie mixture into one to one and a half inch balls using your hands. Place balls in rows one of the parchment lined pan two inches apart. Once all the balls have been rolled and placed on the sheet pan, insert a toothpick in the top of each ball ⅔ of the way into the ball then place the sheet pan in the freezer for 30 minutes. Round up a sauce pan and pyrex or glass bowl to make a double boiler. Place an inch and a half of water (or about 1/2 cup of water) in the saucepan and nestle the pyrex or glass bowl over the saucepan but be sure the bottom of the bowl doesn’t touch the water. If it does, get a larger bowl or remove some of the water. Place the saucepan with the pyrex bowl over the saucepan on the stove and turn up the heat to medium low and add both bags of candy coating discs Or if you have a double broiler, fill the broiler with water and add both bags of candy coating discs to the double boiler. Once your double boiler is tact, place both bags of the primary color candy coating discs into the bowl. Be sure to stir often as they begin to melt. As the candy coating begins to melt it will be thick and will need to be thinned out using 1 tablespoon sections of Crisco. Add and mix the Crisco until completely melted before adding another portion. The end consistency will be thick enough to coat the back of a spoon but still thin enough to drip off. Be sure not to walk away from the candy coating as it can burn easily and needs to be stirred often.
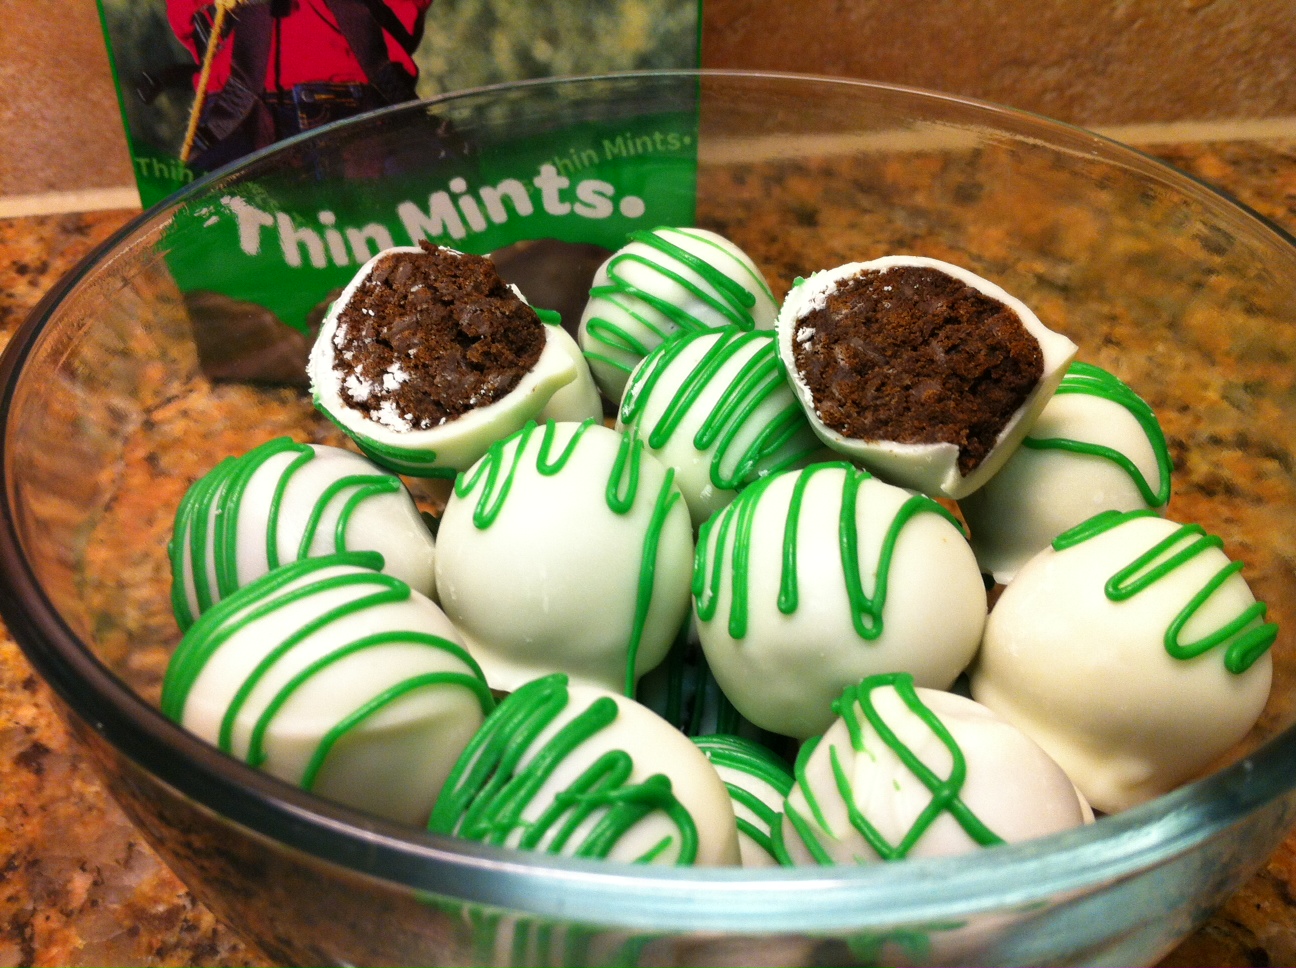
Once the candy coating is melted, remove the sheet pans of cookie balls from the freezer. Line a new sheet pan with parchment paper and set it on the counter next to the double broiler. Dip a hardened cookie ball into the melted candy coating, swirling to remove any excess. Once coated and excess has been removed, place on each ball to form rows on one of the parchment lined cookie sheets. Once they are slightly set, you will be able to wiggle the toothpick out of the ball without much effort at all. Once all balls are coated with candy coating and the toothpick is removed, place the sheet pans back into the refrigerator for 10 to 15 minutes to set. The hole in the top of the ball can be hidden by using a second candy coating color.
If you have chosen to work with a secondary color, begin melting amount needed based on decoration using a small microwavable bowl and a few candy coating discs. For example, if you copying the design in the photo above, then only 1/4 of the chips of the second color will need to be melted. Set your microwave for two minutes and stir the candy coating every 20 seconds until completely melted. Based on the amount of balls you will be decorating with a second color, you can utilize a pastry bag with a small tip or a sandwich or quart sized ziplock bag. If utilizing a ziplock baggie, stuff the bag inside a large glass or plastic cup with opening covering edges. Once secondary color is melted, pour into ziplock lined cup. Remove the bag from cup and seal. With sharp scissors cut a small opening in one of the two bottom corners… but just a sliver. It is easier to make a larger hole larger if necessary. Remove the chilled, set balls from the refrigerator and decorate by pushing the melted candy coating towards the opening and squeezing as you go. Be careful as the candy coating will still be hot. Once decorated, return to the refrigerator for another five to ten minutes to fully set.
Pull your now frozen single thin mint cookie from the freezer and compare it to a thin mint cookie ball. Enjoy!